This is a quick and simple tutorial with a choice of three clocks to make. No mid-century room is
complete without an iconic wall clock.
Clock 1
Materials
20 mm wood disks (I found mine at the Dollarstore)
8 cocktail sticks
1/32” basswood or mat board
Wood Glue
Mitre cutter
Start by cutting your cocktail sticks to about 30 mm or longer if you prefer. Sand the rough end.
Glue to the edge of your disk as shown in the picture below. Allow to dry.
Paint with a brass, metallic paint and allow to dry.
Cut a strip from your basswood or matboard, 8mm wide. Set your mitre cutter to 60 degrees and cut 8 diamond shapes at 8mm lengths.
Stain or paint if you are using matboard. Cut the tip from one end and glue to the clock between the cocktail sticks and allow to dry.
Find a suitable face slightly smaller than the wood disk. Glue in the centre and varnish. I used a silk varnish.
Clock 2
Materials
1/32” basswood or mat board
Paper
Wood glue
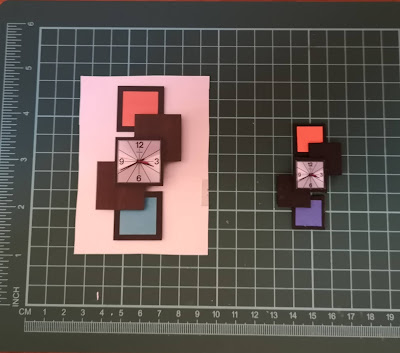
Cut 5 squares, 18mm x 18mm.
Paint all of them with black acrylic paint.
Print clock face so that it measures 14mm x 14mm. From coloured paper cut two squares 14mm x 14mm. I used some scrapbooking paper that I had.
Glue clock face and coloured squares to the centre of 3 of the black squares. Glue squares in configuration shown below. Varnish to finish.
Clock 3
Materials
2 x 20mm wood disks
Dressmakers pins with coloured ball heads
Wood glue
Super glue
Scrap basswood or mat board. (for clock hands)
Cut your pins to the length that you prefer and using the super glue, attach to one of the wooden disks. Allow to dry. Glue the second disk on top to hide the pin ends. Allow to dry.
Paint the face the colour that you like. Cut the hands and paint. Apply to the face of the clock with the wood glue.
Happy Modelling.


No comments:
Post a Comment